Google Contacts
Screenshots
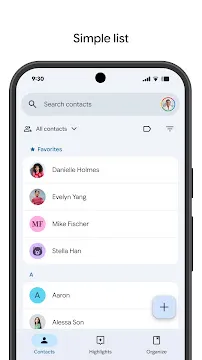
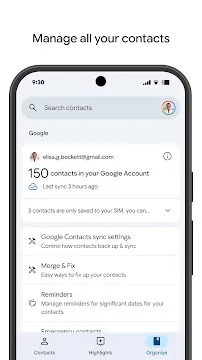
Google Contacts helps you manage your digital address book with ease. It stores all your phone numbers, email addresses, and physical locations in one secure place. This app makes sure you never lose a contact when you switch to a new phone. It works quietly in the background to keep your life organized.
You can access your contact list from any device that has your Google account. This means you can start a chat on your tablet and finish it on your phone. The app syncs your data instantly across the cloud. It turns a messy pile of numbers into a clean and searchable directory.
How to Download and Install Google Contacts APK for Android
Managing your address book should be simple and efficient. Google Contacts provides a clean way to store phone numbers, email addresses, and birthdays. Many people prefer the official Google version over the default apps included by phone manufacturers. If your device lacks this app, you can manually install it. This guide explains how to download and install the Google Contacts APK on your Android device safely.
Why Choose Google Contacts?
The app offers several advantages for daily use. It synchronizes your data across different devices instantly. If you lose your phone, your contacts remain safe in your Google account.
- Smart Cleanup: The app finds and merges duplicate entries.
- Easy Organization: You can group people using custom labels.
- Information Recovery: The trash folder allows you to restore deleted contacts for up to 30 days.
- Work Integration: It displays job titles and company info for professional accounts.
Step 1: Prepare Your Android Device
Android security settings usually block apps from unknown sources by default. You must change this setting before you can install an APK file.
- Open the Settings menu on your phone.
- Navigate to the Security or Privacy section.
- Look for the option labeled Install Unknown Apps.
- Select the web browser you plan to use for the download.
- Switch the toggle to Allow from this source.
This step ensures your phone accepts the file you are about to download.
Step 2: Download the Google Contacts APK
You need to find a reliable website that hosts APK files. Look for a version that matches your Android operating system.
- Open your mobile browser.
- Visit Filetomob.com.
- Search for “Google Contacts APK Download”.
- Navigate to the app page.
- Click the Download Google Contacts APK button.
- Wait for the file to finish saving to your “Downloads” folder.
Step 3: Install the App
Once the download finishes, you can start the installation process. It only takes a few moments to complete.
- Swipe down on your notification bar or open your File Manager.
- Tap on the downloaded APK file.
- A prompt will appear asking if you want to install the application.
- Tap Install at the bottom of the screen.
- Wait for the progress bar to finish.
- Select Open to launch the app immediately.
Step 4: Set Up and Sync Your Contacts
After opening the app, you need to sign in to your Google Account. This step links your data to the cloud.
- Grant the necessary permissions for the app to access your phone and storage.
- Select the primary Google account you wish to use.
- Wait for the app to pull your existing data from the internet.
- Check the settings menu to ensure Contact Sync is active.
Active synchronization ensures that any change you make on your phone appears on your tablet or computer.
Final Safety Tips
Security is important when you install apps manually. After you finish the installation, go back to your settings. Disable the Install Unknown Apps permission for your browser. This prevents accidental downloads in the future. Keeping your device updated also helps protect your private information. Now you can enjoy a clean and organized contact list on your Android phone.
Getting Started With Google Contacts on Your Android Device
You just installed Google Contacts on your Android phone. This app helps you organize your digital life. It keeps your phone numbers, email addresses, and physical addresses in one safe place. Managing your connections becomes much easier once you understand the basic features.
Syncing Your Contacts
First, you must ensure your contacts sync with your Google Account. This step protects your data. If you lose your phone, your contacts stay safe in the cloud.
- Open the Settings menu within the app.
- Tap on Google Contacts sync settings.
- Check the Status to see if syncing is active.
- Toggle the switch to On if it is currently off.
Now, any change you make on your phone will show up on your computer or tablet. This creates a seamless experience across all your devices.
Making Google Contacts the Default
Android phones often come with a basic “People” or “Contacts” app made by the phone manufacturer. To avoid confusion, you should set Google Contacts as your default application.
- Setting the Default App
- Open your phone’s Settings menu.
- Tap on Apps or Manage Apps.
- Look for an option labeled Default apps.
- Tap on the Phone or Contacts category.
- Select Google Contacts from the list.
Now, whenever you click a phone number in another app, your phone will use Google’s interface.
Handling New Contacts
You also want to make sure new numbers save to Google by default instead of the local phone storage.
- Go back into the Google Contacts app.
- Tap your Profile Picture in the top right corner.
- Select Contacts app settings.
- Look for Default account for new contacts.
- Select your primary Gmail address.
Organizing With Labels
Groups make finding people faster. Google Contacts uses Labels instead of folders. You can tag people based on how you know them. This keeps your personal and professional lives separate.
- Tap the Menu icon (three horizontal lines).
- Select Create label.
- Type a name like “Work,” “Family,” or “Gym Friends.”
- Go to your contact list and select the people you want to add.
- Tap the Label icon to assign them to your new group.
Labels help you send group emails quickly. They also help you filter your view when you only want to see specific people.
Cleaning Up Your List
Over time, you might save the same person twice. This makes your list look messy. The app includes a tool to fix this automatically.
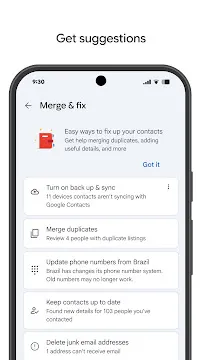
Look for the Fix & manage tab at the bottom of your screen. Tap Merge & fix. The app searches for duplicate entries. It looks for matching names, phone numbers, or emails. You can review each match or tap Merge all to clean everything at once. This keeps your address book lean and accurate.
Customizing Contact Details
You can add more than just a name and a number. Detailed profiles help you remember important facts about your contacts.
- Add Photos: Tap the camera icon on a contact profile. A photo helps you recognize callers instantly.
- Set Custom Ringtones: You can assign a specific sound to your best friend or your boss. This lets you know who is calling without looking at the screen.
- Add Birthdays: Enter a birthday in the contact details. Your Google Calendar will then remind you when their special day arrives.
- Notes Field: Use this area to write down how you met someone or the names of their children.
Backing Up Your Data
Even though the app syncs to the cloud, you might want a physical backup. You can export your list as a file.
Go to Fix & manage and select Export to file. Choose the account you want to back up. The app creates a .vcf file. You can save this file to your SD card or internal storage. This adds an extra layer of security to your important information.
Using Search Effectively
If you have hundreds of contacts, scrolling takes too long. Use the Search bar at the top. You do not have to type the full name. Typing a few letters or a company name will show the right results immediately. The search tool is fast and saves you time every day.
By following these steps, you take full control of your Android contact list. You will find people faster and keep your data organized for years to come.
Google Contacts: A Core Features Walkthrough
Google Contacts helps you manage your connections on Android. You can use it to store phone numbers, email addresses, and personal details. The app keeps your data in sync across all your devices automatically.
Managing Your Contacts
The app makes it easy to handle your list of friends and colleagues. You can add new people or remove those you no longer need.
Add a New Contact
You can create a new entry in just a few steps. First, open the Contacts app on your Android phone. Look for the plus (+) icon or the Create contact button.
- Type in the person’s name.
- Enter their phone number and email.
- Select the Google account where you want to save the information.
- Tap Save at the top of the screen.
Edit Existing Information
People often change their phone numbers or move to new jobs. You should keep your list updated to stay in touch. To change a contact:
- Tap the name of the person you want to update.
- Select the Edit icon (it usually looks like a pencil).
- Modify the fields that need new information.
- Press Save to apply the changes.
Delete a Contact
If you no longer need a specific entry, you can remove it. Open the contact and tap the three dots in the corner. Select Delete and confirm your choice. The app moves the contact to the trash. It stays there for 30 days before the system removes it forever.
Adding Personal Details
You can make your contacts more useful by adding specific details. These details help you recognize callers and remember important dates.
Add Photos
A photo helps you identify a caller at a glance. To add a picture, edit the contact and tap the Camera icon. You can take a new photo or choose one from your gallery. This image will appear whenever that person calls you.
Track Birthdays
Never miss a celebration by adding birthdays to your contact list.
- Open a contact and tap Edit.
- Scroll down to find More fields or Important dates.
- Enter the date of birth.
- Save the entry. Google Calendar will then show these birthdays automatically.
Write Notes
The notes section is perfect for extra information. You can record how you met someone or list their favorite hobbies. To do this, find the Notes field during the editing process. Type your text and save the contact. This feature turns a simple phone number into a helpful profile.
Using these tools keeps your social and professional life organized. You can find everyone quickly and stay updated on their lives.
Google Contacts: Organization & Labels
Managing a long list of phone numbers and email addresses can feel overwhelming. Without a clear system, finding the right person takes too much time. Google Contacts on Android offers powerful tools to tidy up your digital address book. By using labels and smart groups, you can turn a messy list into an efficient tool for your daily life.
Labels vs. Folders: Understanding the Difference
Many people think of organization in terms of folders. In a folder system, a file stays in one specific place. If you move it, it leaves the old spot. Google Contacts works differently because it uses labels instead of folders.
Labels provide more flexibility for your contact list. Think of a label like a digital sticky note. You can stick multiple notes on a single person.
- Folders are restrictive: A contact can usually only live in one folder at a time.
- Labels are multi-dimensional: One person can be a “Client,” a “Friend,” and a “Neighbor” all at once.
When you view a label, you see everyone assigned to that category. However, the contact still remains in your main list. This system ensures you never lose a name just because you categorized it.
How to Create and Manage Labels on Android
You can set up your system directly from your phone. Follow these simple steps to start grouping your contacts:
- Open the Contacts app on your Android device.
- Tap the Menu icon (three horizontal lines) in the top left corner.
- Look for the Labels section and tap Create label.
- Type a name for your group, such as “Work” or “Family,” and tap OK.
- To add people, tap the Add contact button (the plus sign) within the label screen.
- Select the names you want to include.
Building Smart Groups for Success
Strategic grouping helps you communicate faster. Instead of searching for individuals, you can reach out to entire sets of people. Here are a few “smart groups” you should consider creating:
- Neighbors: Keep local emergency contacts and neighborhood friends in one spot. This is helpful for quick updates about the area.
- Clients: Grouping business leads or active customers allows you to track professional relationships. It also makes sending group emails much easier.
- Project Teams: If you are working on a specific task, group everyone involved. Once the project ends, you can simply delete the label without losing the contacts.
- Service Providers: Keep your plumber, electrician, and mechanic under one “Home Services” label.
Why Effective Organization Matters
Using labels saves you from endless scrolling. When you need to send a quick text to your “Soccer Team” or an invite to your “Neighbors,” you can do it in seconds. Since Google Contacts syncs with Gmail, these labels also work when you compose emails on your computer.
Clean organization also prevents duplicates. When you see your contacts in specific groups, you notice if you have saved the same person twice. You can then use the “Merge and Fix” tool to keep your list lean. Start labeling today to make your Android device a better tool for staying connected.
Google Contacts: Syncing & Backup
Losing your phone contacts can be a stressful experience. Fortunately, Google Contacts makes managing your address book simple and safe. This guide explains how to keep your contacts in sync across all your devices and how to recover them if they disappear.
How Sync Works Across Devices
Google keeps your contact list in the cloud rather than just on your physical phone. When you add a new phone number on your Android tablet, it appears on your smartphone almost instantly. This process happens automatically whenever you are connected to the internet.
The Benefits of Cloud Syncing
- Real-time updates: Any change you make on one device reflects on all others.
- Easy upgrades: When you buy a new phone, you simply sign in to your Google Account to see your entire list.
- Web access: You can view and edit your contacts from any web browser by visiting the Google Contacts website.
How to Enable Sync on Android
- Open your device Settings.
- Find and tap on Google.
- Select Settings for Google apps.
- Tap Google Contacts sync.
- Check the Status to ensure syncing is turned on.
You should also check the Also sync device contacts setting. This feature ensures that contacts saved locally on your SIM card or phone memory also move to the cloud.
Restoring Deleted Contacts
Sometimes you might delete a name or number by mistake. You do not need to panic because Google provides a safety net for these situations.
Using the Trash Folder
Google Contacts includes a Trash folder that holds deleted items for 30 days. If you realize you made a mistake within this window, follow these steps:
- Open the Google Contacts app.
- Tap Fix & manage at the bottom of the screen.
- Select the Trash icon.
- Choose the contact you want to save.
- Tap Recover.
Rolling Back Your Entire List
If you accidentally deleted many contacts or had a sync error, you can “undo” changes to your entire contact list. You can go back to any point in time from the last 30 days.
- Open the Google Contacts app or website.
- Go to Settings within the app.
- Tap Undo changes.
- Select a time frame (such as 10 minutes ago, yesterday, or a custom date).
- Confirm your choice to restore your list to that state.
Keeping Your Contacts Safe
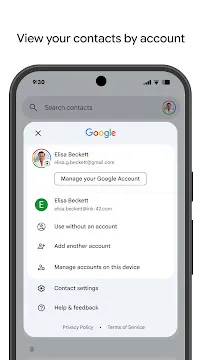
To maintain a healthy contact list, you should check your sync settings regularly. Make sure you are signed into the correct Google Account. If you use multiple accounts, you can manage which ones sync to your phone.
By using these tools, you ensure that your friends and family are always just a tap away. You no longer have to worry about losing a phone or making a manual error. Google handles the backup process quietly in the background, giving you peace of mind.
Google Contacts: Hidden Features
Many users treat their phone book as a simple list of names and numbers. However, Google Contacts on Android includes advanced tools that help you manage your communication more effectively. You can save time and improve your privacy by using these tucked-away options. Here is a guide to the best hidden features in the app.
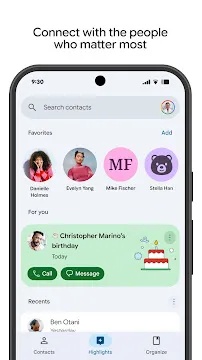
Discover the History Tab
Modern versions of the app now include a dedicated section for your interactions. This tab tracks your recent activity with specific people. You no longer need to jump between your call logs and text messages to see when you last spoke to someone.
- Interaction Tracking: The app lists your most recent calls and messages in one place.
- Contextual Details: You can see which platform you used to reach out, such as a standard phone call or a digital message.
- Quick Follow-up: This area allows you to return a missed connection without searching through your entire list.
By checking this section regularly, you stay organized. It helps you remember who you need to call back.
Master Fixed Dialing Numbers (FDN)
Fixed Dialing Numbers is a security feature that limits which outgoing calls your phone can make. This is perfect for parents who want to restrict their child’s phone usage. It also works well for businesses that provide devices to employees.
To use this, you usually need a PIN2 code from your service provider. Once you enable FDN, the phone can only call numbers that you have added to the specific FDN list.
- Restrict Outgoing Calls: The device blocks any number not on the approved list.
- Emergency Access: Emergency services remain available even when FDN is active.
- SIM-Level Security: Since the settings stay on the SIM card, they remain active even if you move the card to another phone.
Using FDN provides peace of mind. It ensures your device only connects with trusted people.
Use Long-Press Shortcuts
You can save several taps by using the long-press gesture on the app icon. Android apps offer “App Shortcuts” that appear when you hold your finger on the icon for a second.
Instead of opening the app and clicking the plus button, try long-pressing the Google Contacts icon on your home screen. A small menu will appear instantly.
- Create New Contact: You can jump straight to the “Add Contact” screen from your home screen.
- Search Directly: Some versions allow you to start a search without opening the main list first.
- Dynamic Shortcuts: The menu often shows your most frequent contacts. You can tap their name to call or message them immediately.
You can even drag these shortcuts onto your home screen. This creates a dedicated button for a specific action or person.
Manage Your Digital Identity
The app also lets you clean up your data easily. Look for the “Fix & manage” tab to find the merge tool. This tool finds duplicate entries and combines them. It keeps your list lean and accurate. You can also restore contacts that you deleted by mistake within the last 30 days.
Managing Google Contacts Privacy on Android
Your phone contains sensitive information about your family, friends, and coworkers. Because of this, managing your Google Contacts is a vital part of your digital safety. You can decide which apps see your data. You can also hide specific people so they do not appear in your main list.
Follow this guide to master your privacy settings.
Control App Access and Permissions
Android allows you to choose exactly what other apps can do with your contact list. Many apps ask for permission to read your contacts. However, they do not always need this information to work.
Adjusting Permissions in Settings
You can change these settings at any time. Use the following steps to review your permissions:
- Open the Settings app on your Android device.
- Find and tap on Apps.
- Select See all apps and find the specific app you want to check.
- Tap Permissions.
- Look for Contacts in the list.
- Choose Don’t allow if you want to block that app from seeing your people.
Using the Contact Picker
Modern Android updates now use a “Contact Picker” for many apps. This feature is a great win for your privacy. Instead of giving an app your entire address book, you only select one person. The app only sees the details for that specific individual. This prevents apps from collecting data on everyone you know.
Hiding Sensitive Contacts
Sometimes you want to keep certain names private. You might have sensitive work contacts or personal numbers you prefer to keep out of sight. You have a few ways to keep these hidden from your main phone book.
Moving Contacts to the Archive
The easiest way to remove a person from your main list without deleting them is through the “Hide” feature.
- Open the Google Contacts app.
- Tap on the contact you wish to hide.
- Select the three dots in the top right corner.
- Tap Hide from contacts.
This moves the person to a separate category. They will still exist in your account, but they will not clutter your primary list.
Using the Secure Folder
If you use a Samsung device or a phone with similar “Safe Folders,” you can move contacts there. These folders require a PIN or fingerprint to open.
- Open your Secure Folder.
- Add the Contacts app to the folder.
- Move your private contacts into this protected space.
- Delete the original entry from your main phone book.
Best Practices for Contact Safety
Maintaining a private digital life requires regular maintenance. Use these tips to stay secure:
- Audit your apps monthly: Check your permission manager regularly to see which apps still have access.
- Remove unused accounts: If you have old email accounts synced to your phone, they might be importing old contacts.
- Limit sync settings: Only sync contacts with accounts you trust.
- Check the web version: Visit the Google Contacts website to manage bulk hiding or labels more easily.
By following these steps, you keep your personal information safe and organized. You control who sees your data and where your private information stays.
Google Contacts for Android: Voice and Assistant Features
Using your phone hands-free makes life much easier. Google Assistant connects with your Google Contacts to help you stay in touch without touching your screen. You can call friends, add new numbers, and manage your list using just your voice.
“Hey Google, Call [Name]”: Boosting Accuracy
The most common command is asking Google to make a call. However, the system works best when your contact list is organized. If you have five friends named “Alex,” the Assistant might get confused.
Use Labeled Contacts for Better Results
Labels and specific details act as guides for the AI. When you add a “Label” or a specific relationship, the Assistant understands context better.
- Relationship Labels: Tell Google who people are. You can say, “Hey Google, Sarah is my sister.” Next time, you can just say, “Call my sister.”
- Location Labels: Use labels like “Work” or “Home” for phone numbers. If a contact has two numbers, specify which one to use. Say, “Call Alex at work.”
- Phonetic Names: If a name is hard to pronounce, add a phonetic spelling in the Google Contacts app. This helps the voice recognition software match your speech to the right person.
Adding Contacts via Voice Command
You do not need to type every time you meet someone new. You can add people to your list while you are driving or walking.
To start, simply say, “Hey Google, add a new contact.” The Assistant will then guide you through a few steps:
- Name: It will ask for the person’s name.
- Phone Number: You can dictate the digits clearly.
- Email or Details: You can add extra info if needed.
This feature saves time and ensures you don’t forget to save an important number. The information syncs instantly across all your signed-in Android devices.
Current Limitations of Voice Features
While the voice system is advanced, it cannot do everything yet. Knowing these limits helps you avoid frustration.
- Label Creation: You can use existing labels, but you cannot create a brand-new label category using only your voice. You must open the app to create a new “Group” or “Label” manually.
- Mass Editing: Voice commands work best for one contact at a time. If you need to delete ten people or merge duplicates, the manual app interface is necessary.
- Complex Notes: Dictating long paragraphs into the “Notes” section of a contact can sometimes lead to errors. It is better to keep voice-added notes short and simple.
Quick Tips for Voice Success
To get the most out of these features, follow these simple steps:
- Speak Clearly: Use a natural pace.
- Sync Often: Ensure your contact sync is turned on in your Android settings.
- Check Duplicates: Periodically use the “Fix & Manage” tab in the app to clean up your list.
Using these voice features turns your Android device into a helpful assistant. By labeling your contacts and using clear commands, you make your communication faster and more accurate.
Frequently Asked Questions About Google Contacts for Android
How Do I Sync My Contacts?
Syncing ensures that your phone numbers appear on every device you use. When you sign in to your Google Account on your Android phone, your contacts usually sync automatically. However, you might need to check your settings if they do not appear.
- Open the Settings app on your phone.
- Find and tap on Google.
- Select Settings for Google apps and then Google Contacts sync.
- Check the Status to make sure Automatically sync is turned on.
If you prefer to do it yourself, you can manually refresh the list. Open the Contacts app and pull down from the top of the screen.
Can I Restore Deleted Contacts?
Accidents happen, and sometimes you delete a name you actually need. Fortunately, Google provides a safety net. When you delete a contact, it moves to the Trash folder.
- Open the Contacts app.
- Tap Organize at the bottom.
- Select Trash.
- Find the name you want back and tap Recover.
Keep in mind that items stay in the Trash for only 30 days. After that period, the system removes them permanently.
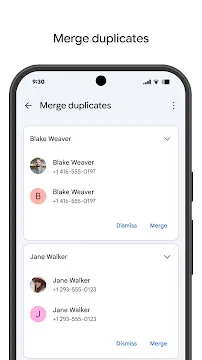
How Do I Merge Duplicate Contacts?
Over time, you might save the same person twice with different details. This makes your list look messy. Google can find these duplicates for you.
- In the Contacts app, tap the Organize tab.
- Look for the Merge & fix option.
- The app will show you suggestions for contacts that share the same name or number.
- Tap Merge all to combine them into single entries.
Where Are My Contacts Saved?
Android devices can save information in different places. You can save them to your phone’s internal storage, your SIM card, or your Google Account.
Saving to your Google Account is the best choice. If you lose your phone or buy a new one, your contacts will reappear as soon as you sign in. To move a local contact to your Google Account:
- Select the contact you want to move.
- Tap the three dots for Contact settings.
- Choose Move to another account.
- Select your Google email address.
How Do I Back Up My Contacts?
While syncing is automatic, you can also create a manual backup file. This is useful if you want to move your data to a service that does not use Google.
- Go to the Organize tab in the app.
- Tap Export to file.
- Choose the account you want to export.
- Save the .vcf file to your device or cloud storage.
What Should I Do if Sync Is Not Working?
Sometimes sync stops because of a setting or a small software glitch. If your contacts are not updating, try these quick steps:
- Check your internet: Ensure you have a stable Wi-Fi or data connection.
- Check battery saver: Some phones stop syncing when the battery is very low.
- Clear the cache: Go to your phone settings, find the Contacts app under Apps, and tap Clear Cache.
How Do I Block a Number via Contacts?
If you want to stop receiving calls or texts from a specific entry, you can do it directly from their profile.
- Open the contact you wish to block.
- Tap the three dots in the corner.
- Select Block numbers.
- Check the box if you want to report the number as spam, then tap Block.